Selenium Python configuration for Firefox in headless mode

This worked for me :

Import few modules:

from selenium import webdriver
from selenium.webdriver.firefox.options import Options as FFOptions

then set the driver:

options = FFOptions()
options.add_argument('--headless')
self.driver = webdriver.Firefox(firefox_options=options)

Please note that you have to have the latest FF (57 will do) and selenium 3.8.0 approximately.

Errors when starting Blender on Windows, related to PYTHONPATH : Solved

I needed to document this here as every new release I run into the same issue when starting Blender. It crashes on start. Found the solution on the net:

Create a batch file to start Blender. I named mine blender.bat (quite original).

Contents of the file :

set PYTHONPATH=""
cd C:\Program Files\Blender Foundation\Blender\
start blender.exe

Adjust your install location as needed. Then just save and double click to start. Voila!

To connect to a Mongo 3.x DB you need to use Mongo 3.x client or Mongo 3.x compatible UI

I was just setting up Mongo database on a CentOS server. Tried to connect from a remote Ubuntu machine and failed. Tried to connect with older copy of MongoVue and failed. Tried everything, setting mongod.conf to all kinds of values, changing iptables, creating and recreating DBs, admin and other users. No luck. Wasted a day.

Then only thanks to this post I learned that it might be due to incompatibility of versions.
https://stackoverflow.com/questions/31091121/failed-connection-in-mongovue#comment50198839_31091121

I tried to connect from a machine that had Mongo 3.x installed and … success. I also installed Robo 3T from www.robomongo.org and it worked like a charm as well. Might save someone time.

Here are some messages that I was getting when trying to connect from old version of MongoVue:

Unable to connect to server asdfasdffake.com:27017: Object reference not set to an instance of an object..
Type: MongoDB.Driver.MongoConnectionException
Stack:    at MongoDB.Driver.Internal.DirectMongoServerProxy.Connect(TimeSpan timeout, ReadPreference readPreference)
   at MongoDB.Driver.MongoServer.Connect(TimeSpan timeout)
   at MongoDB.Driver.MongoServer.Connect()
   at MangoUI.MMongo.QSDlL5xzK686iCExThO(Object )
   at MangoUI.MMongo.Open(Boolean mustWrite)
   at MangoUI.MMongo.Open()
   at MangoUI.ComNavTree.eocHiDskdDq1GPOj7uu(Object )
   at MangoUI.ComNavTree.ExpandMe(MTreeNode expand)
   at MangoUI.ComNavTree.tree_BeforeExpand(Object sender, TreeViewCancelEventArgs e)


Object reference not set to an instance of an object.
Type: System.NullReferenceException
Stack:    at MongoDB.Driver.MongoServerInstance.RefreshStateAsSoonAsPossible()
   at MongoDB.Driver.Internal.MongoConnection.HandleException(Exception ex)
   at MongoDB.Driver.Internal.MongoConnection.SendMessage(BsonBuffer buffer, Int32 requestId)
   at MongoDB.Driver.Internal.MongoConnection.SendMessage(MongoRequestMessage message)
   at MongoDB.Driver.Operations.CommandOperation`1.Execute(MongoConnection connection)
   at MongoDB.Driver.MongoServerInstance.RunCommandAs[TCommandResult](MongoConnection connection, String databaseName, IMongoCommand command)
   at MongoDB.Driver.MongoServerInstance.Ping(MongoConnection connection)
   at MongoDB.Driver.MongoServerInstance.Connect()
   at MongoDB.Driver.Internal.DirectMongoServerProxy.Connect(TimeSpan timeout, ReadPreference readPreference)


Connection was refused
Unable to connect to server asdfasdffake.com:27017: Invalid credential for database 'test_db'..
Type: MongoDB.Driver.MongoConnectionException
Stack:    at MongoDB.Driver.Internal.DirectMongoServerProxy.Connect(TimeSpan timeout, ReadPreference readPreference)
   at MongoDB.Driver.MongoServer.Connect(TimeSpan timeout)
   at MongoDB.Driver.MongoServer.Connect()
   at MangoUI.MMongo.QSDlL5xzK686iCExThO(Object )
   at MangoUI.MMongo.Open(Boolean mustWrite)
   at MangoUI.MMongo.Open()
   at MangoUI.MConnection.get_IsValid()
   at MangoUI.WinConnect.SCOjR9kYRPerNNngykW(Object )
   at MangoUI.WinConnect.btnTest_Click(Object sender, EventArgs e)


Invalid credential for database 'test_db'.
Type: MongoDB.Driver.MongoAuthenticationException
Stack:    at MongoDB.Driver.Communication.Security.MongoCRAuthenticationProtocol.Authenticate(MongoConnection connection, MongoCredential credential)
   at MongoDB.Driver.Communication.Security.Authenticator.Authenticate(MongoCredential credential)
   at MongoDB.Driver.Communication.Security.Authenticator.Authenticate()
   at MongoDB.Driver.Internal.MongoConnection.Open()
   at MongoDB.Driver.Internal.MongoConnection.GetNetworkStream()
   at MongoDB.Driver.Internal.MongoConnection.SendMessage(BsonBuffer buffer, Int32 requestId)
   at MongoDB.Driver.Internal.MongoConnection.SendMessage(MongoRequestMessage message)
   at MongoDB.Driver.Operations.CommandOperation`1.Execute(MongoConnection connection)

Python BeautifulSoup4 parsing XML and searching for attribute string value

This example was not on the BeautifulSoup4 documentation page, so I’ll put it here:

I had an XML document with a series of these tags/attributes (removed the brackets as WP did not like it):


token name="Street1" value="aaaaaaaa-bbbb-cccc-dddd-eeeeeeeeeee1"/
token name="Street2" value="aaaaaaaa-bbbb-cccc-dddd-eeeeeeeeeee2"/
token name="Street3" value="aaaaaaaa-bbbb-cccc-dddd-eeeeeeeeeee3"/

None of the examples in the documentation were working for me when needing to use regex to search for string inside an attribute. This was the recommended method but it did not work:

souppage.find_all(name=re.compile("Street"))

There was a different note about searching for an attribute with specific text in the doc. Something like this:

souppage.find_all(attrs={"name": "Street"})

Slightly modified to include regex and it becomes:

souppage.find_all(attrs={"name": re.compile("^Street")})

A quick summary below should provide a list of tokens where the name attribute starts with Street:


import re
from bs4 import BeautifulSoup
xmlfile = open("SomeImportantXML.xml","r")
xmlfile_contents = xmlfile.read()
souppage = BeautifulSoup(xmlfile_contents,'lxml')
souppage.find_all(attrs={"name": re.compile("^Street")})

Docker Selenium Hub with multiple PhantomJS Selenium Nodes on CentOS

Docker installation on CentOS is documented nicely here:

https://docs.docker.com/engine/installation/linux/centos/

Quick summary:

yum install -y yum-utils
yum-config-manager --add-repo https://download.docker.com/linux/centos/docker-ce.repo
yum makecache fast
yum install docker-ce
yum list | grep docker
systemctl start docker
docker run hello-world

Find the docker you want :

https://hub.docker.com/r/selenium/

I got selenium-hub and rocketboy phantomjs (that’s the only phantomjs that worked for me from the site above):

docker pull selenium/hub
docker pull rocketboy/node-phantomjs

List all installed images:

docker images

This site proved useful for the following step:

http://www.assertselenium.com/continuous-delivery/setting-up-selenium-grid-using-docker/

Set up the dockers and start them using commands below:
Set up the selenium hub:

docker run -d -p 5000:4444 --name selenium-hub -P selenium/hub

Now set up separate dockers for phantomjs and link them back to the hub (so that the hub will distribute among these nodes)

docker run -d --link selenium-hub:hub -P --name rocketboy_phantomjs_001 rocketboy/node-phantomjs
docker run -d --link selenium-hub:hub -P --name rocketboy_phantomjs_002 rocketboy/node-phantomjs
docker run -d --link selenium-hub:hub -P --name rocketboy_phantomjs_003 rocketboy/node-phantomjs
docker run -d --link selenium-hub:hub -P --name rocketboy_phantomjs_004 rocketboy/node-phantomjs
docker run -d --link selenium-hub:hub -P --name rocketboy_phantomjs_005 rocketboy/node-phantomjs
docker run -d --link selenium-hub:hub -P --name rocketboy_phantomjs_006 rocketboy/node-phantomjs
docker run -d --link selenium-hub:hub -P --name rocketboy_phantomjs_007 rocketboy/node-phantomjs
docker run -d --link selenium-hub:hub -P --name rocketboy_phantomjs_008 rocketboy/node-phantomjs

Type “docker ps” to see your active dockers listed. “docker ps -a” will list started and stopped dockers:

docker ps
fake16814a7b        rocketboy/node-phantomjs   "/opt/bin/entry_po..."   4 weeks ago         Up 11 days                                   rocketboy_phantomjs_008
fake1674c768        rocketboy/node-phantomjs   "/opt/bin/entry_po..."   4 weeks ago         Up 11 days                                   rocketboy_phantomjs_007
fake105bb95b        rocketboy/node-phantomjs   "/opt/bin/entry_po..."   4 weeks ago         Up 11 days                                   rocketboy_phantomjs_006
fake114d33cb        rocketboy/node-phantomjs   "/opt/bin/entry_po..."   5 weeks ago         Up 11 days                                   rocketboy_phantomjs_005
fake146fbfba        rocketboy/node-phantomjs   "/opt/bin/entry_po..."   5 weeks ago         Up 11 days                                   rocketboy_phantomjs_004
fake1f3a9a3d        rocketboy/node-phantomjs   "/opt/bin/entry_po..."   5 weeks ago         Up 11 days                                   rocketboy_phantomjs_003
fake12d3acc7        rocketboy/node-phantomjs   "/opt/bin/entry_po..."   5 weeks ago         Up 11 days                                   rocketboy_phantomjs_002
fake13d6e0d8        rocketboy/node-phantomjs   "/opt/bin/entry_po..."   5 weeks ago         Up 11 days                                   rocketboy_phantomjs_001
fake10f534d2        selenium/hub               "/opt/bin/entry_po..."   7 weeks ago         Up 11 days          0.0.0.0:5000->4444/tcp   selenium-hub

You can pull up this URL (replace example_test_box.zcom with your test server URL) and see your grid console in a browser:

http://example_test_box.zcom:5000/grid/console

Now when setting the Selenium driver (Python), use something like below (replace example_test_box.zcom with your test server URL):

self.driver = webdriver.Remote("http://example_test_box.zcom:5000/wd/hub", webdriver.DesiredCapabilities.PHANTOMJS)

Now when running the tests, they will be distributed amongst the eight phantomjs dockers. Eight actually might be an overkill and slow down your test machine. In that case just stop one or two and see how much load is optimal.

Stop docker like this:

docker stop fake16814a7b

Start docker like this:

docker start fake16814a7b

To see the dynamic logs for a docker, use:

docker logs -f fake16814a7b

Enjoy!

Have not tried docker compose yet, but when I do I will post my findings.

Poor man’s Selenium parallel test execution with PhantomJS (or maybe rich man’s)

I am sure anyone running Selenium tests run into issues with long test execution times. Once we got to a thousand or so test cases it would take multiple hours to run the test suites. We wanted to speed it up. Some notes below:

  • We were running all tests with one specific user login per DB. If we tried to log in at the same time the program would recognize it and bump the earlier log in out. Solution for that was to create separate users for each test suite. That would mean that the test suites could run in parallel as different users could be logged in to the same DB at once.
  • Our regular login method pulled a user from a JSON file unique for tester’s DB. We had to create test suite users for all DBs. A small script helped with that, not much time lost. When someone runs the automation set up script for their DB it adds these now.
  • We included a setting where the tester running the suites could specify if they wanted originally specified user to run these, or use the test suite based users.
  • To run in parallel we could just start the tests in PyCharm (for example) one after the other and it would start separate phantomjs instances and execute test suites in parallel.
  • From command line, it was even easier as we usually run these from Linux machines and we would run with ampersand at the end, something like : nosetests sometestshere.py &
  • Sixteen test suites that used to take 3-4 hours now take 30-45 minutes.
  • Since this is dependent on the tester’s machine power, we usually run 5-7 test suites at once,then run the other 5-7 and similar. Otherwise a noticeable slowdown is observed.
  • The main goal for this was to allow testers to run tests quicker in the simplest possible way with minimal training and it totally worked.
  • We also have docker set ups that can run all 16 test suites at once, but that’s another post.

Waiting for page elements in Selenium tests. When all else fails use time.sleep()

This is when using Selenium with Python. Especially where there is a lot of javascript involved, on numerous occasions I spent too much time trying to figure out how to wait for an element to be present. The solution was often to put a time.sleep(0.5) in the test execution and it would work. Prior to this I would try just about any wait, even writing my own loops to wait for an element. So just a quick blurb. If you run into an issue where there is javascript invoved on a page and have trouble locating/clicking and element, time.sleep() might be your friend.

Selenium Python quick note. If you .send_keys(“5”) then .send_keys(“5”) again, it will populate “55” in the form.

Selenium Python quick note.

Let’s say you have a form that you have to populate. If you execute  send_keys(“5”) then send_keys(“5”) again a bit later before submitting form, it will populate “55” in the input field. It will not replace the existing 5 with a new 5. You first have to .clear() to do that.

self.driver.find_element_by_id("myinput").send_keys("5")

Above example produces “55”

self.driver.find_element_by_id("myinput").send_keys("5")
self.driver.find_element_by_id("myinput").clear()
self.driver.find_element_by_id("myinput").send_keys("5")

Above example produces “5”

PyCharm 2017.1 issue with running tests in subfolders (from UI) workaround

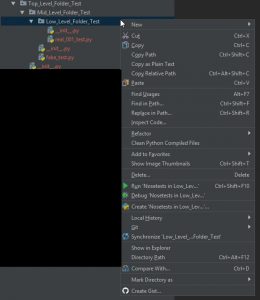
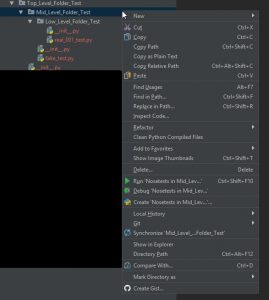
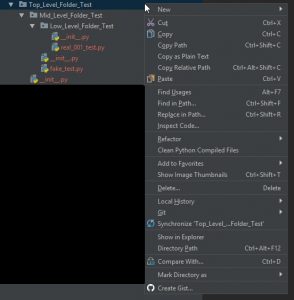
Noticed this after updating to PyCharm 2017.1. We ran some of our tests by right clicking on a top level folder then selecting “Run Nosetests in ..” from the right click menu. This does not work any more as the right click option is missing, unless you have tests in all subfolders.

Here is a workaround that worked for me. I do not necessarily recommend it, but it does the job: Place a fake test file in the top level directory. I tried in several combinations but it seems like just placing in top level directory that you want to run from is enough. Try it. If not, then place in all subfolders.

This is how my fake_test.py looks like. When running, it completes in 1ms so not a time hog.


import unittest
class FakeTest(unittest.TestCase):
    def setUp(self):
        pass
    def test_nothing(self):
        pass
    def tearDown(self):
        pass

Below are also some images to illustrate the point better. I have three levels of folders. I captured the screenshot of right click menu for low/mid/top level folders. Only the low level has a real test file. The others do not. By placing a fake_test.py file in the mid level, one can run tests from UI from the mid level right click menu. In the last image you can also see that the menu option “Run Nosetests in ..” is missing from the top level as it does not have any test files.

Hope this helps someone.Pycharm_test_folders_001
Pycharm_test_folders_002
Pycharm_test_folders_003

Selenium with Python. Button is grayed out. Need to wait for it to be clickable.

There is a method for that.
“EC.element_to_be_clickable” comes in handy.
In below example, the Continue button would not get enabled until the form fields were filled in properly. Sometimes the test would whiz through too fast and the click of the Continue button would fail. This way, it waits for it to be clickable. Nice.

wait.until(EC.element_to_be_clickable((By.ID, Page1ofSetUp.Button_Continue)))

You will need to import a few items and instantiate:

from selenium.webdriver.support import expected_conditions as EC
from selenium.webdriver.common.by import By
wait = ui.WebDriverWait(self.driver, 10)